In order to prevent an electric shock
and short circuit, be sure to turn power off before performing work by touching
the interior parts of the product.
In order to prevent an electric shock
and short circuit, be sure to turn power off before performing work by touching
the interior parts of the product.
[Previous page][Next page][Table of Contents]
8 . HANDLE MECHA
In order to prevent an electric shock
and short circuit, be sure to turn power off before performing work by touching
the interior parts of the product.
Be careful so as not to damage wirings. Damaged wiring can cause an electric shock or short circuit accident.
This work should be performed by the Location's Serviceman. Performing work by non-technical personnel can cause shock hazard.
Don not touch places other than those specified. Touching places not specified can cause an electric shock accident.
In the test mode, if the handle V.R. value movements are irregular, adjust
or replace the V.R. in the following procedure.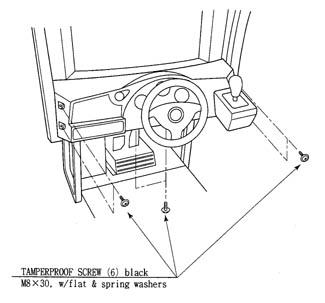
8 - 1 REMOVING THE CONTROL PANEL
(1) Turn the power switch off.
(2) Remove a total of Tamperproof Screws from both sides of the Control Panel's front part.
(3) Remove the 2 Tamperproof Screws from the underside of the Control Panel.
(4) Wiring Connectors are connected inside the Control Panel. Carefully draw the Control Panel in a manner so as not to damage the wiring.
(5) Disconnect the wiring connector.
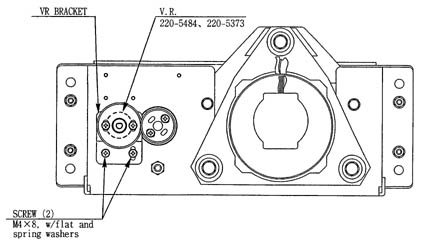
8 - 2 REPLACING AND ADJUSTING THE HANDLE'S V.R.
REPLACING THE VOLUME
(1) Turn Power off.
(2) Disconnect the Connector.
(3) Take out the 2 screws which secure the Volume Bracket and remove the Volume bracket.
(4) Take out the 2 screws to remove the Volume Gear and replace Volume.
(5) After replacing the Volume, perform Volume setting in the Volume Setting mode.
ADJUSTING THE VOLMUE
(1) In the test Mode, have the Volume value indicating screen displayed.
(2) Loosen the 2 screws which secure the Volume bracket to disengage the gear mesh.
(3) With the Steering wheel in the centering position, cause gears to be engaged in a manner so that the Volume Shaft is in the status shown in the figure below.
(4) Fasten the screws which secure the Volume Bracket.
(5) Peform Volume setting as per the Volume Setting Mode.
8 - 3 GREASING
Be sure to use designated grease. Using undesignated grease can cause parts damage. Do not apply greasing to places other than those specified. Greasing to undesignated places can cause malfunctioning and the qualitative deterioration of parts.
Once in 3 months, apply greasing to Volume Gear Mesh Portion. For spray greasing, use GREASE MATE (P.No. 090-0066).
In order to prevent an electric shock and short circuit accident, be sure to turn power off before performing work by touching the interior parts.
Be careful so as not to damage wirings. Damaged wirings can cause an electric shock or short circuit accident. Do not touch places other than those specified. Touching places not specified can cause an electric shock or short circuit accident.
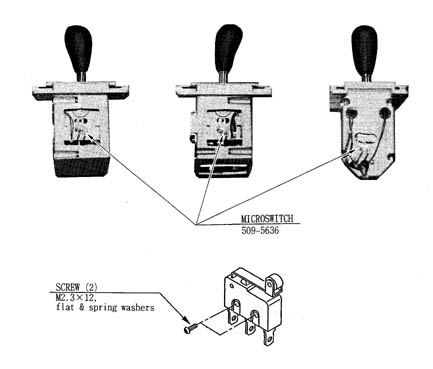
If the Shift Lever operation is not satisfactory, remove the Shift Lever in the following procedure and replace the micro switch.
9 - 1 REMOVING THE SHIFT LEVER
(1) Turn Power off.
(2) Take off the 4 screws and remove SHIFT COVER A.
(3) Take out the 4 SPECIAL BOLTS and pull the SHIFT LEVER UNIT upward by paying careful attention so as not to cause damage to the wiring.
(4) Disconnect the connector to allow the unit to be removed
9 - 2 SWITCH REPLACEMENT
Each Micro switch is secured with 2 screws. Remove the 2 screws and replace the Micro switch.
After replacing the Switch, check to see if the switch is inputted as per Shift Lever operation in the Test Mode.
After replacing the Switch, check to see if the switch is inputted as per Shift Lever operation in the Test Mode.