11-2 REPLACEMENT AND ADJUSTMENT OF SWITCH
METHOD OF REPLACEMENT
- Disconnect the wiring connector of the SW to be replaced.
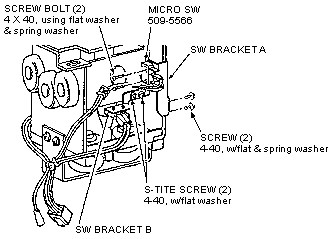
- Take off the 2 screws which secure the BRACKET (SW BRACKET
A & B) to which the SW is attached, and remove the SW together
with the bracket. (FIG. 11.2)
- Take off the 2 screws which secure the SW, and replace the
SW.

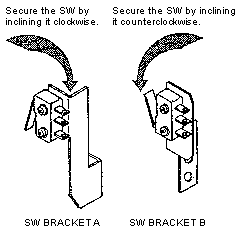
- To secure the replaced SW to the bracket, incline it as shown
(FIG. 11.3). Securely fasten the screws by applying an anti-
loosening agent to the screws.
- Install the SW bracket with 2 screws. When installing SW
BRACKET A, an adjustment in the following procedure is required.
- After SE replacement, check the SW input in the test mode.

ADJUSTMENT TO BE MADE AT THE TIME OF INSTALLING SW BRACKET
A
- Shift to the first or second gear.
- At this time, secure SW bracket A with 2 screws in a manner
so that the SW attached to SW Bracket A is caused to be ON.


