[Previous page][Next page][Table Of Contents]
[1]. ASSY OF PTV
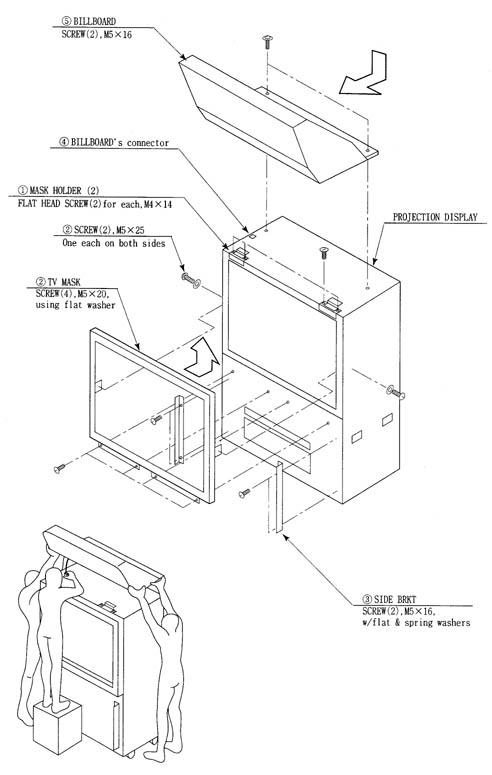
(1.) By using the specified screws, secure the 2 Mask Holders t o the Projection Display ceiling.
(2.) Insert the TV Mask from the underside as shown and secure with a total of 6 screws.
(3.) While supporting the Billboard by 2 persons, another person using a step is to insert the Billboard Connector into the Terminal Board of Projection Display ceiling.
(4.) Insert the Billboard From the front as shown and secure with 2 screws
![]()
In order to prevent accidents during assembly work, have all of the leg adjusters of the PTV Base make contact with the surfaces to secure the PTV Base.
(5.) Mount the assembled PTV Base . After mounting the PTV, move it to the rear part of the PTV Base. When performing this work, be sure to use 4 or more persons.
(6.) Connect the wires wired to the PTV Base to the PTV Connector Panel.
(7.) Insert the wiring connectors, each of which wire covering is red, green, and blue, to the corresponding one of R.G.B. terminals as per connector panel display inside the PTV, and insert the remianing wire connector to the SYNC terminal. The connector's insertion angle is predetermined. Inserting the connector in a forcible manner will damage the connector. Check for the correct inserting direction and then insert the connector.
(8.) After insertion of the connector, turn the connector's ring clockwise to lock the connection.The connector panel has 3p white connector in addition to the connectors displayed as R.G.B. and SYNC.

(9.) Connect the wiring coming from the PTV Base power supply unit to the 3p white connector.
Mount the assembled PTV on the PTV Base. After mounting the PTV, move it to the rear part of the PTV Base.
When performing this work, be sure to use 4 or more persons.
(10.) Temporarily fasten the PTV Holders to the PTV Base with a screw
for each Holder
(11.) Secure the Front Panel to the front of the PTV with 4 screws. At this time, by using the underside 2 screws, tighten together with the PTV Holder.